How to Add a Custom Watermark to Recorded Videos
Adding a watermark to videos recorded with oCam helps clearly indicate the source of the video and reduce the chance of unauthorized use by others. A watermark is a feature that inserts a specific image into the video, such as a logo, text, or icon, to identify the creator or ownership. This is effective for protecting the uniqueness of the video and promoting your brand.
To add a watermark in oCam, first click 'Tools' in the top menu of the oCam main window, then select 'Options'. When the Settings window opens, click 'Watermark' in the left menu to go to the watermark settings screen.
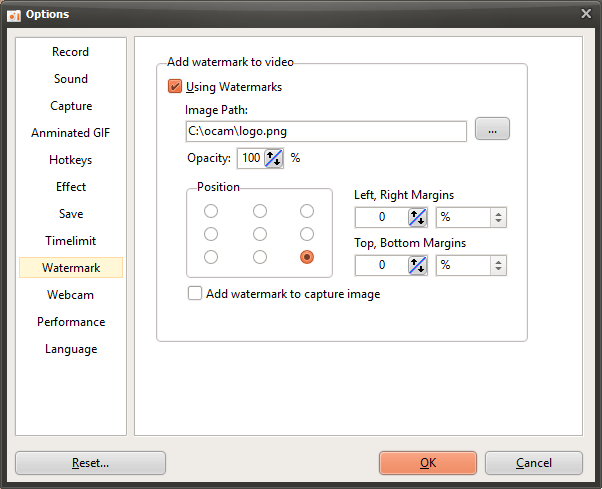
On the watermark settings screen, you can adjust several options. First, if you check 'Use Watermark', the selected image will be inserted as a watermark in the recorded video. You can choose the image to use as the watermark under 'Image Path', and PNG, JPG, and BMP formats are supported. PNG format in particular also supports images with an alpha channel (transparency), so you can use logos or images with transparent backgrounds.
The 'Opacity' setting adjusts the transparency of the watermark image. If the opacity is set to 100%, the watermark image will appear fully opaque. The lower the value, the more transparent the image becomes, allowing it to blend more naturally into the video. This lets you adjust the watermark so it does not interfere with the readability of the video.
The 'Position' setting determines where the watermark appears in the video. For example, you can choose the top left or bottom right so the watermark appears in the desired area of the screen. This allows you to place the watermark without covering the main content of the video.
For example, if you set a specific logo image as the watermark and start recording, that image will appear as a watermark at the selected position in the final video. A watermark added in this way makes the source of the video clear and helps viewers easily identify the creator.
If you want to create your own watermark image, search for "create watermark" on a search site to find various design tools and methods. For example, you can use graphic editing programs such as Photoshop or Canva to create a logo or text, or use an online watermark generator to easily create a distinctive watermark.
Using the watermark feature in oCam, you can give your videos a more professional and secure finish with just a few simple settings. Try creating your own unique videos with the right image and settings.
Today's News/Tips
How to Install oCam in a Different Location
If you run the oCam installation file from the command line with a specific parameter, you can change the installation path as you want. This allows you to install the program in a folder of your choice instead of the default installation path.
To change the installation path, use the following parameter:
`"/dir=installation path"`
This parameter is used to specify the desired installation path when running the installer. For example, if you want to install oCam in a specific folder, simply add this parameter when entering the command.
To apply the parameter, follow these steps:
1. Open the Start menu and select 'Run'. Or press the Windows key + R shortcut to open the Run dialog box.
2. In the Run dialog box, enter the command in the following format:
`"installer file path" "/dir=installation path"`
For example, if the oCam installer file is located at `C:\Downloads\oCam_Setup.exe` and you want to install it to `D:\Program Files\oCam`, enter the following command:
`"C:\Downloads\oCam_Setup.exe" "/dir=D:\Program Files\oCam"`
When you run the above command, oCam will be installed to the specified path, `D:\Program Files\oCam`. This method is useful for users who want to customize the installation process, especially if they want to organize programs in a specific directory.
It is important to enter the parameter correctly in the command line, and both the installer file path and the installation path should be enclosed in quotation marks so that the command runs properly even if spaces or special characters are included. With this simple method, you can freely change the installation path of oCam.