What to Do If Chrome Blocks the Download with "Blocked by Chrome because it's dangerous."
When trying to download OhSoft software (for example, oCam) in the Google Chrome browser, you may see the warning message "Blocked by Chrome because it's dangerous." This issue occurs because Chrome has incorrectly detected the OhSoft program as unsafe, which is a false positive.
This does not usually happen, but it may occasionally occur shortly after an update has been released.

OhSoft programs are safe software that do not distribute malware, sponsored programs, or any other malicious software. This warning is most likely the result of Chrome's security filter making an incorrect judgment based on the file's source or reputation information. To resolve this issue, follow the steps below:
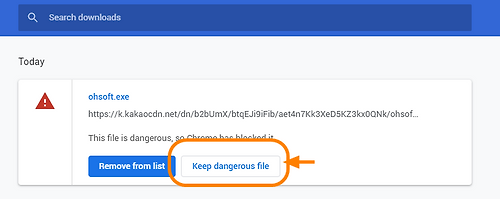
1. In Chrome's download bar (the download notification shown at the bottom), click the warning message.
2. In the window that appears, click the "[Show all]" button.
3. When the additional options window opens, select "[Keep dangerous file]" and proceed with the download as instructed.
By following this process, you can bypass Chrome's block and safely download the OhSoft software.
If the problem continues, you may also temporarily disable the Safe Browsing feature in Chrome settings or contact OhSoft for assistance.
Today's News/Tips
A Brief Overview of CapturePlus Features
CapturePlus is a convenient screen capture tool that supports a wide range of capture and editing features.
It is compatible with Windows XP through Windows 11, and supports more than 20 image formats as well as dual monitors.
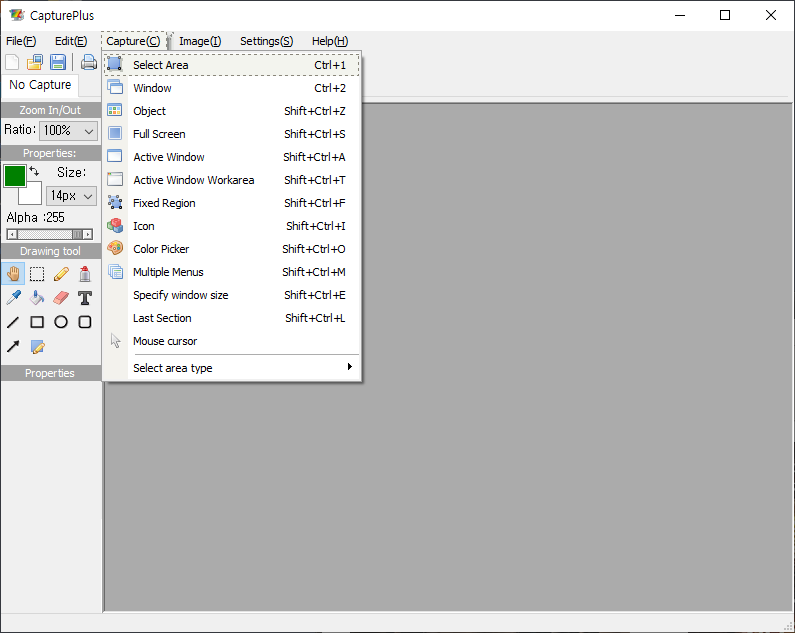
The main screen is arranged with the main menu and toolbar at the top, and drawing tools on the left.
If you are using CapturePlus for the first time, go to Screen Capture -> Select Area from the menu (hotkey: Shift + Ctrl + R), then drag to select the area you want to capture. You will then be able to view the captured screen immediately.

Screen Capture Feature(Screen Capture)
Select Area, Window, Window Scroll, Object, Full Screen, Active Window, Active Window Work Area, Fixed Rectangle Area, Window Icon, Color Capture, Menu Capture, Set Window Size, Last Capture Area, Mouse Cursor

Image Editor(Image Editor)
With the built-in image editor, you can annotate and highlight images with text, arrows, shapes, and more, along with many other useful features.

Image Effect(Image Effect)
You can apply effects to images very easily. Invert Colors, Black and White Effect, Saturation Adjustment, Brightness Adjustment, Add Noise (Color), Add Noise (Mono), Apply Mosaic, Rotate, Flip, Resize Image, Resize Canvas

Preferences and Additional Features(Additional Function)
Using the advanced settings, you can customize hotkeys, file naming, image quality, tray icons, and many other options.