Setting the Codec - Selecting an External Video Codec (VFW)
oCam is a simple and intuitive screen recording program that offers a user-friendly interface and a wide range of features, making it a useful tool for everyone from beginners to IT professionals. In particular, oCam supports a variety of codecs so users can record with the quality and settings they want. Among them, using external VFW (Video for Windows) codecs such as x264vfw or Xvid allows for a more flexible recording environment. Below is a detailed explanation of how to set up and use external codecs in oCam.
How to Set Up an External Codec
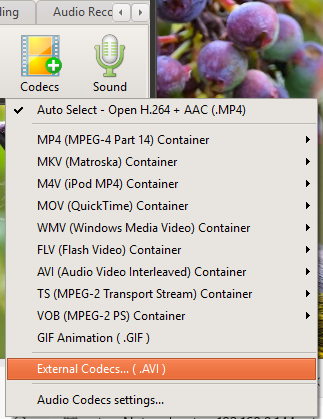
To use an external codec in oCam, you first need to go to the program's codec settings menu. On the main screen of oCam, click the Codec menu located at the top or in the settings menu, and a pop-up window related to codec selection will appear. This pop-up window provides options for choosing built-in codecs and external codecs, and here you should select the external codec option. Please note that external codecs support only the AVI container format. This is because the AVI format has excellent compatibility with VFW-based codecs.
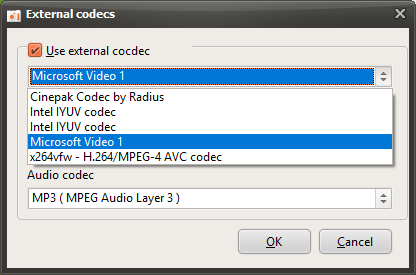
When you select the external codec option in the pop-up window, a new settings window will open. This window includes a checkbox labeled 'Use External Codec,' and you need to enable this checkbox to configure an external codec. After checking the box, click the combo box at the bottom of the window to display a list of VFW-based external codecs installed on your computer. For example, if codecs such as x264vfw or Xvid are installed, you can choose the one you want from this list. After selecting a codec, click the OK button to save the setting.
Recording with an External Codec
Once the codec setup is complete, the external codec you selected will be applied automatically when you start recording in oCam. The x264vfw codec provides a high compression ratio and excellent image quality, making it suitable for high-resolution video recording, while Xvid is useful in a variety of environments thanks to its relatively small file size and stable performance. You can choose the appropriate codec based on the type of content you want to record. For example, you can choose x264vfw for high-quality gameplay recording, or Xvid if you want to minimize file size.
The recorded video will be saved in AVI format, and the image quality and file size will vary depending on the characteristics of the selected codec. Therefore, when using an external codec, it is a good idea to check and optimize the codec settings in advance, such as bitrate and frame rate. Some codecs provide a separate settings window where you can adjust detailed options, so using that when needed can give you more satisfying results.
Disabling the External Codec
If you no longer want to use an external codec, you can easily revert the setting. Go back to the Codec menu in oCam, select the external codec option, and then clear the 'Use External Codec' checkbox. Once the checkbox is cleared, oCam will automatically switch back to the built-in codec that was previously in use. Built-in codecs are generally easier to configure and are suitable for users who do not want more complex settings. Even after switching back to a built-in codec, recording quality remains stable, and you can still get optimized results based on oCam's default settings.
Advantages and Precautions When Using External Codecs
The biggest advantage of using external codecs is that you can fine-tune image quality and file size exactly the way you want. In particular, codecs such as x264vfw can save high-quality video in relatively small file sizes, which is a major benefit for users working with high-spec content. On the other hand, the relevant codec must be installed on your computer, and some codecs can consume a large amount of system resources, so your hardware specifications should be taken into account. Also, due to the nature of the AVI container, compatibility may be more limited than with other formats such as MP4, so it is worth keeping this in mind if you plan to edit or share the recorded video afterward.
Today's News/Tips
oCam Quick Overview of Key Features
oCam (oCam) Key Features Overview
You can see the following screen when you run the program.
Select one of the top tabs to choose the recording type first: Screen Recording, Game Recording, or Sound Recording, and then start.
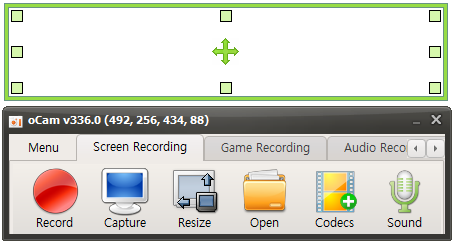
This is a brief explanation of the buttons for each function.

Record - Pressing this button starts recording immediately. The recorded video can be viewed by pressing the Open button.

Capture - Captures the screen.

Open - Opens the folder containing recorded videos, recorded audio, and captured images in Windows Explorer.

Codec - Sets the codec to use when pressing the record button in oCam.
By default, you can use oCam's built-in codec, hardware codecs such as NVIDIA NVENC, and VFW (external codec).
You can also select GIF recording.
Sound - For screen recording and sound-only recording, you can set whether to record only system sound, record both system sound and microphone, or not record sound.
Game Recording - To record a game, click the Game Recording button. When the Game Recording button is activated, activate the game window and then press the recording hotkey to start recording.
In addition, you can configure many detailed program features in Menu -> Options.
Recording Area - There is a large rectangle, several small square boxes, and a drag-shaped icon in the center.

The large rectangle is the recording or capture area.
The small squares can be dragged to adjust the size of the recording or capture area.
The drag icon in the center can move the recording or capture area.
You can also move it more precisely by using the arrow keys together with Ctrl and Shift.