How to Record Audio Only with oCam
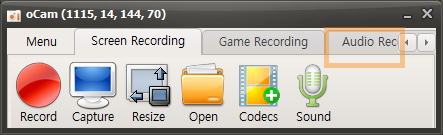
On the main screen of oCam, click the Audio Recording tab to open a simple, user-friendly menu. This menu provides various recording options in oCam, allowing users to adjust the settings as needed. One of oCam's strengths is its intuitive interface, which makes it easy to use for everyone from beginners to IT professionals.
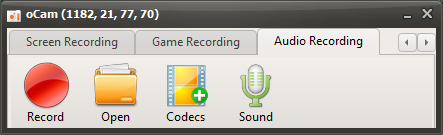
You can use this feature whenever you want to record only audio, such as for creating audio content, recording podcasts, or capturing background music.
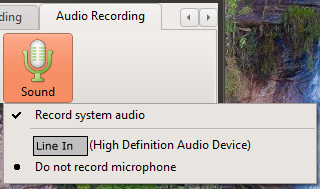
Click the Sound button to choose the audio source, such as system sound or microphone input settings, and then click the Record button on the screen to start recording. This feature is very useful for tasks where you need to focus only on audio. For example, it is efficient when you want to extract lecture audio separately, record an interview, or make a simple voice recording. Thanks to oCam's simple controls, these settings can be changed in just a few clicks, making the user experience even more convenient.
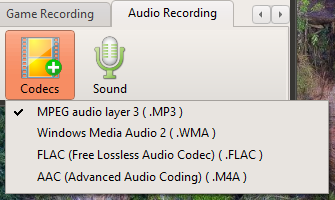
By default, audio files are saved in MP3 format. MP3 is one of the most widely used formats for audio recording because it offers small file sizes and excellent compatibility with most devices and software. It provides a good balance between sound quality and file size, making it suitable for general use. However, for users with more specific needs, oCam also provides an option to select audio codecs other than MP3 through the Codec button. If you choose AAC format, you can maintain high sound quality with efficient compression, giving you more flexibility depending on your project.
These settings clearly show how simple yet powerful oCam is. oCam is more than just a screen recording tool. It is versatile software that also supports professional audio recording tasks. Users can further adjust details such as the file save location, audio quality, and input source in the oCam settings menu. For example, you can adjust the volume levels of the microphone and system sound separately, or specify a save folder to optimize your workflow. Thanks to this flexibility and convenience, oCam is widely used in many different environments, from individual users to IT professionals. If you want high-quality audio recordings, it is recommended to adjust the codec and detailed settings to match your working environment for the best results.
Today's News/Tips
What Are Codecs and Digital Container Formats?
When using oCam normally, you do not need an in-depth understanding of codecs and digital container formats. However, if you want to use oCam's extended features or optimize your recording settings, it is useful to understand these two terms. Below is an easy explanation of codecs and digital container formats, focused on how they relate to oCam.
* What is a digital container format?
A digital container format refers to familiar file extensions such as AVI, MP4, MOV, and FLV. It is a meta file format that defines the structure for storing video, audio, and metadata (for example, subtitles and time information) together in a single file. Simply put, you can think of a container format as the framework of a file structure that determines how video and audio data are stored.
For more information, see Wikipedia:
https://en.wikipedia.org/wiki/Container_format
For example, if a file is an AVI file, the container format is AVI, and the video and audio data inside that file are stored according to the structure defined by AVI. A container format acts like a "container" that holds the data, while the actual method used to encode the data is determined by the codec.
* What is a codec?
A codec is hardware or software that performs encoding and decoding. It includes algorithms for compressing data, decompressing it, or converting it into another format. In oCam, codecs are used to convert screen video data into a video file and to generate audio data. The generated data is then saved according to the digital container format selected by the user.
For more information about codecs, see Wikipedia:
https://en.wikipedia.org/wiki/CodecSimply put, a codec is a tool that compresses and converts video or audio data so it can be stored or played back efficiently. Common codecs used in oCam include XVID, MPEG-1, MPEG-2, MPEG-4, and H.264, while common audio codecs include MP3 and PCM.
* Codecs and container formats in oCam
In oCam, a codec is used to encode video and audio data in order to convert screen recording data into a video file. This encoded data is then saved as a file in the digital container format selected by the user, such as AVI or MP4. For example:
- If the file extension is AVI, the container format is AVI, and the video data inside may be encoded with H.264 or MPEG-4. The audio data may be saved as MP3 or PCM.
- In the case of an MP4 file, the container format is MP4, and it may similarly contain video encoded with H.264 and audio encoded with MP3.
* Summary
In oCam, the digital container format is the framework that defines the file structure, such as AVI or MP4, while the codec is the method used to compress and convert the video and audio data inside it, such as H.264 or MP3. oCam's default settings are enough for high-quality recording, but depending on your specific purpose, such as optimizing file size or improving editing compatibility, adjusting the codec and container format can make your workflow more efficient. If needed, try selecting the codec and format you want in oCam's codec settings menu.