What Video Codecs and Container Formats Are Supported?
oCam supports a range of video codecs and container formats so that users can choose from various recording options.
Below is information about the video codecs supported by oCam.
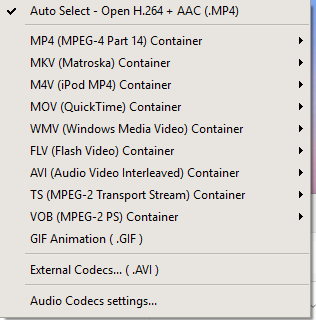
* How to Check Supported Video Codecs
You can check the video codecs supported by oCam simply by clicking the 'Codec' button in the oCam main window. From this menu, you can easily view and adjust the list of available codecs and their settings.
* Supported Video Codecs
oCam supports the following video codecs for different container formats. Each codec is encoded according to the selected container format:
- MPEG-1: Used with the AVI container format and widely compatible as an early digital video compression standard.
- MPEG-2: Used with the TS and VOB container formats and suitable for DVDs and broadcast streaming.
- MPEG-4: Used with a wide range of container formats, including MP4, MKV, M4V, MOV, FLV, and WMV. oCam uses MPEG-4 as its default codec, offering high compression and good quality.
- XVID: Used with the AVI container format. It is an open-source codec based on MPEG-4, and oCam internally uses the MPEG-4 codec with only the FourCC set to XVID.
- OpenDivx: Used with the AVI container format, also based on MPEG-4, with the FourCC set to OpenDivx.
- Microsoft MPEG-4 Part 2: Used with the AVI container format and set as oCam's default codec. It can be played in most video players, such as Windows Media Player, without installing additional codecs.
- Microsoft MPEG-4 Part 3: An additional option available for the AVI container format, offering compatibility and quality.
* Relationship Between Container Formats and Codecs
oCam supports various container formats, and according to the image you provided, the supported container formats are as follows:
- MP4 (MPEG-4 Part 14): Uses the MPEG-4 codec.
- MKV (Matroska): Uses the MPEG-4 codec.
- M4V (iPod MPEG-4): Uses the MPEG-4 codec.
- MOV (QuickTime): Uses the MPEG-4 codec.
- WMV (Windows Media Video): Uses the MPEG-4 codec.
- FLV (Flash Video): Uses the MPEG-4 codec.
- AVI (Audio Video Interleave): Uses MPEG-1, MPEG-2, MPEG-4, XVID, OpenDivx, Microsoft MPEG-4 Part 2, and Part 3.
- TS (MPEG-2 Transport Stream): Uses the MPEG-2 codec.
- VOB (MPEG-2 PS): Uses the MPEG-2 codec.
- GIF (Graphics Interchange Format): Can be saved as an animated GIF when recording video.
- Audio Recording: Saved in AAC (MP4) format.
By default, oCam records in the AVI container using the Microsoft MPEG-4 Part 2 codec, and this setting is suitable for beginners because it can be played immediately in Windows Media Player and other players without installing additional codecs. MPEG-4, XVID, and OpenDivx are all internally based on the MPEG-4 codec, with only different FourCC codes used to extend compatibility.
* Audio Codec
The audio data saved during recording is encoded in MP3 format, and in some cases, such as with the MP4 container, AAC format is also supported.
* Additional Information
If you install external codecs, you can use more codec options, which will be covered in detail in a separate post. You can adjust oCam's codec settings to match your desired quality and file size, so check the options through the 'Codec' button and test them as needed.
Today's News/Tips
How to Set Up Automatic Login Using Autologon.exe
Here is how to set up automatic login using the autologin tool.
This method uses Autologon.exe from Microsoft's official Sysinternals Suite. It also provides a certain level of security by storing the password in encrypted form in the registry.
How to Set Up Automatic Login Using Autologon.exe
1. Download Autologon
Official Microsoft site: https://learn.microsoft.com/en-us/sysinternals/downloads/autologon
File download link: https://download.sysinternals.com/files/AutoLogon.zip
Click the Download Autologon button at the link above to download the ZIP file.
After extracting it, you will see the `Autologon.exe` file.
2. Run Autologon and Configure It
Run `Autologon.exe` as administrator. (Right-click → "Run as administrator")
When the window opens:
Username: The account to log in automatically
Domain: In most cases, the computer name is filled in automatically
Password: Enter the password for that account
Click the [Enable] button
If the message “Autologon successfully configured” appears, setup is complete!
3. How to Disable Automatic Login
Run `Autologon.exe` the same way and click [Disable] to turn off automatic login.