How to Record Microphone and System Audio
Below is a detailed guide on how to record audio and configure the settings in oCam.
Recording System Audio by Default
When you start screen recording with oCam, system audio is recorded automatically by default. This includes all sounds played on your computer, such as video audio, game sound effects, and system notification sounds. This setting is applied immediately without any extra steps, making it very convenient for users who want to record only system audio. For example, when recording gameplay footage or creating software tutorial videos, you can capture only the system audio cleanly.
Recording Microphone Audio as Well
If you want to record microphone audio together with system audio, you only need to adjust the settings slightly in oCam. First, click the "Sound" button on the main screen of oCam. A pop-up window for sound settings will then appear. In this window, a list of available microphone devices is shown, and you can select the microphone you want to use. For example, if you are using an external microphone or a headset microphone, simply select and enable that device. Through this process, both system audio and microphone audio are recorded at the same time, which is very useful when creating lecture videos or recordings that require live narration.
Applying the Audio Recording Settings
Once you select the microphone and complete the settings, oCam immediately applies them. After that, when you start recording, both system audio and microphone audio will be recorded together. This feature is especially effective for situations where both your voice and system sound need to be captured at the same time, such as YouTube content creation, online classes, or game streaming. To make sure the settings have been applied correctly, it is a good idea to run a short test recording and check whether the audio is being recorded properly.
Disabling Audio Recording
Sometimes you may want to capture only the screen video without recording any sound at all. In that case, uncheck the "Record System Audio" option in the sound settings window of oCam, and select "Do Not Record Microphone" in the microphone settings as well. With this configuration, oCam records only the screen video without any sound, which is suitable for tasks where a silent video is needed, such as when you plan to add background music separately later.
Today's News/Tips
Overview of CapturePlus Screen Capture Features
It offers a variety of capture methods, from easily capturing an entire scrollable screen that does not fit on one page by using Window Scroll, to letting users manually select an area to capture.
Each capture is added to a new tab, and options such as automatically saving each capture to the clipboard or automatically saving it as a file to a desired location can be changed in Preferences.
Each capture feature also has a default hotkey assigned, and these hotkeys can also be changed in Preferences to suit your needs.
Each function provides powerful capture options for different situations, so if you try them out yourself, you should be able to get familiar with them without much difficulty.
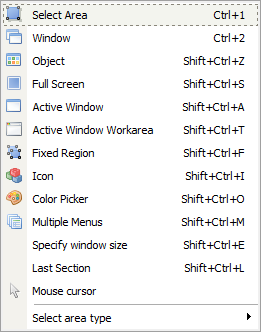
-Select Area (Shift+Ctrl+R): Lets the user manually select the area to capture.
-Window (Shift+Ctrl+W): Helps the user select by window.
-Window Scroll (Shift+Ctrl+C): Easily captures the entire scrollable screen in browsers and Microsoft Office products.
-Object (Shift+Ctrl+Z): Unlike Window Capture, this allows more detailed selection.
-Full Screen (Shift+Ctrl+S): Captures the entire screen.
-Active Window (Shift+Ctrl+A): Captures the currently active program window.
-Active Window Work Area (Shift+Ctrl+T): Captures only the content area of the active program window, with the frame removed.
-Capture Inside a Fixed Rectangle Area (Shift+Ctrl+F): Lets you select a capture area based on the fixed size set in Preferences.
-Window Icon (Shift+Ctrl+I): Lets you select a program area and automatically extracts the icon when selected.
-Color Capture (Color Picker) (Shift+Ctrl+O): This tool, commonly called a color picker, lets you extract the color at the current mouse position on the screen.
-Set Window Size (Shift+Ctrl+E): Lets you select a window, resize it, and then capture it.
-Menu (Shift+Ctrl+M): When a program menu or a shell extension menu opened by right-clicking is displayed, pressing the menu capture hotkey captures only that exact area.
-Last Capture Area (Shift+Ctrl+L): Captures the same area that was used most recently.
-Mouse Cursor Capture: Captures the current mouse cursor.