If Avast is installed, please disable the DeepScreen feature.
When users who use Avast antivirus install or update an OhSoft program such as oCam, the installation process may repeat several times. This is caused by Avast's 'DeepScreen' feature. Below is a detailed explanation of the cause of this issue and how to resolve it.
The DeepScreen feature is triggered when there is not enough reputation information about an executable file, which can cause a program such as oCam to be recognized as suspicious. OhSoft makes efforts to maintain compatibility with antivirus software, but in this case, even though the program is functioning normally, a situation can occur where a legitimate executable file that is not malicious is unable to install or update properly because of a specific antivirus feature. This is similar to a situation where a properly developed program causes inconvenience to users because of a false positive from antivirus software.
To resolve this issue, you need to disable Avast's DeepScreen feature. Below is a step-by-step guide on how to turn off the DeepScreen feature:
1. Go to the main screen of Avast antivirus.
2. Click the 'Settings' button on the left side of the screen.
3. When the Settings window opens, select the 'Antivirus' button from the menu on the left.
4. In the 'Antivirus' section, find the 'Enable DeepScreen' checkbox and clear it.
After changing the setting, confirm that it has been saved, then try installing or updating oCam again. Once the DeepScreen feature is disabled, the repeated installation issue is likely to be resolved. If the problem continues, you may also want to apply the latest Avast updates or contact OhSoft support.
Today's News/Tips
oCam Advanced Settings - Capture
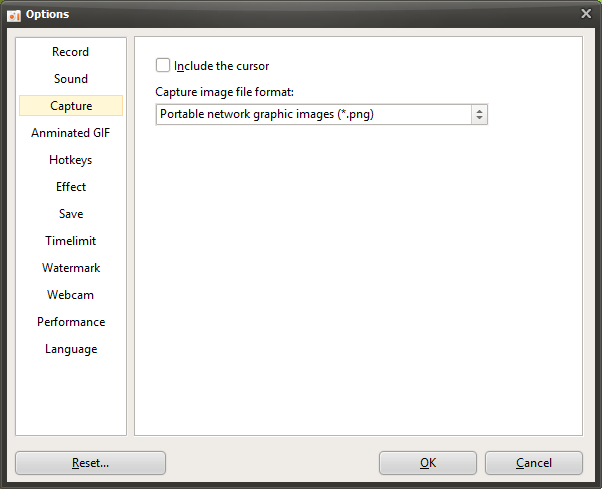
oCam is a multifunctional program that not only supports screen recording but also provides a screen capture feature, allowing users to save specific moments on the screen as images easily. In the settings window that appears when you click the "Tools - Options" menu, the "Capture" category on the left provides options for adjusting settings related to screen capture. This tab is designed so users can customize the details of the capture feature, and it can be used intuitively by everyone from beginners to IT professionals. Below is a detailed explanation of the main settings in the "Capture" category.
Overview of the Capture Feature
The settings in the "Capture" category are the options that apply when you click the "Capture" button in the main oCam window or press the default hotkey (F3). Through these settings, users can choose the format of the captured image and decide whether to include additional elements such as the mouse cursor. The capture feature is very useful when creating tutorials, preparing software documentation, or saving a specific moment on the screen.
Include Mouse Cursor
The "Include Mouse Cursor" option determines whether the mouse cursor will be included in the captured image. By default, this option is unchecked, so the mouse cursor is not included in captured images. This is suitable when you want a clean image. However, if you want to highlight the cursor position for lecture materials or software usage guides, you can check this option to include the cursor in the image. For example, when capturing the process of clicking a specific button, including the cursor can make the material visually clearer.
Image File Format for Capture
The "Image File Format for Capture" setting lets you choose the file format used to save captured images. oCam supports several image formats, and by default it is set to PNG. PNG is the most recommended format because it provides lossless compression, allowing you to save clear images without any loss in quality. Other supported formats may include JPEG and BMP. JPEG is useful when you want to reduce file size, but it may cause some loss of image quality. Users can choose the most appropriate format by considering storage space, image quality requirements, or compatibility with a particular platform.
Usage Tips
The settings in the "Capture" category are simple, but they play an important role in improving how captured images can be used. For example, when creating tutorials, enabling the "Include Mouse Cursor" option can clearly show where the user is clicking or interacting. Using PNG format by default helps maintain high image quality, making it suitable for professional documentation. On the other hand, if minimizing file size is important, you can choose JPEG format to save storage space. If you often use the capture hotkey (F3), changing it to a different key or becoming familiar with it can also help improve your workflow.
In addition, if you want to review and edit captured images immediately after saving them, it is a good idea to set the save location in advance in oCam. This makes it easier to find and use captured images quickly. If you are capturing the UI of specific software or a game screen, be sure to define the capture area accurately so that unnecessary parts are not included.