oCam Advanced Settings - Recording - General Tab
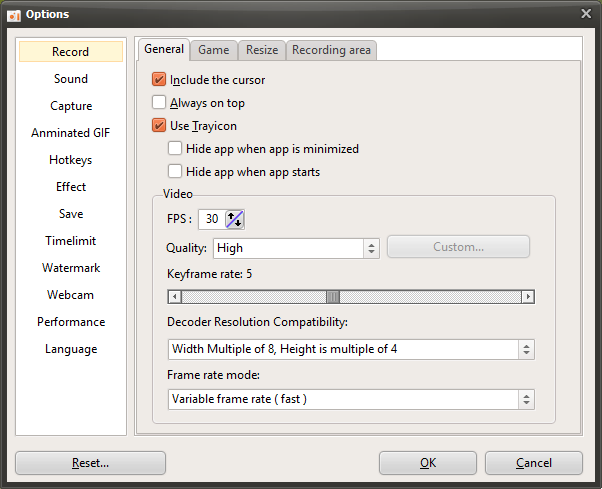
oCam is a powerful program that provides a wide range of settings related to screen recording, allowing users to optimize the recording environment as they want. In particular, when you click "Tools - Options" in the oCam menu, a detailed settings window appears, and under the "Recording - General" tab, you can adjust several important options related to recording. Below is a detailed explanation of the main settings included in this tab. Each setting can be flexibly adjusted according to the user's recording purpose and is designed to be easy to use for everyone from beginners to IT professionals.
Include Cursor in Recording
The "Include cursor in recording" option is enabled by default. When this setting is active, the mouse cursor will appear in the recorded video. This is useful when you need to visually show mouse movement, such as in lecture videos or software tutorials. On the other hand, if you do not want the cursor to appear in the video, simply uncheck this option. For example, if the cursor is unnecessary when recording gameplay footage or certain screen transitions, disabling this setting can help produce a cleaner result.

Hide the Drag Cursor in the Recording Area
The "Hide the drag cursor in the recording area" option is disabled by default. When this setting is turned off, the drag cursor that appears in the center of the screen when selecting the recording area will remain visible. This cursor serves as a visual guide to help users intuitively adjust the recording area. However, if you find this cursor distracting during recording setup or prefer a cleaner interface, you can enable this option to hide it. This setting does not directly affect the recorded video itself and is focused on adjusting convenience during the recording area setup process.
Make the Recording Area Follow the Mouse Cursor During Recording
The "Make the recording area follow the mouse cursor during recording" option is disabled by default. When enabled, the recording area does not stay fixed but instead moves in real time centered around the mouse cursor. This feature is very useful in situations where you need to continuously capture a specific area based on mouse movement, such as recording a dynamic software interface or emphasizing mouse-centered workflow. On the other hand, if you need to record a fixed screen area, it is better to leave this option disabled to maintain a stable recording region.
Frames Per Second (FPS)
The "Frames Per Second (FPS)" setting is an important factor that determines how smooth the recorded video will be. The default value is set to 30 FPS, which is suitable for general screen recording. oCam supports up to 120 FPS, so when recording high-performance games or fast-changing screens, it is recommended to set it to 60 FPS or higher. For example, in racing or action games where screen changes are fast, a higher FPS setting provides smoother and more natural video. However, if you use some built-in codecs such as MPEG-1 or MPEG-2, the FPS setting may be ignored and fixed at 30 FPS, so this should be kept in mind when choosing a codec.
Keyframe Interval
The "Keyframe Interval" setting controls how often keyframes are created during video compression. The default value is 5, which means a keyframe is created every 5 seconds. If you set it to 1, a keyframe is created every second, and if you set it to 2, one is created every 2 seconds. The shorter the keyframe interval, the more precise cut editing becomes during video editing, but file size may increase. On the other hand, a longer interval reduces file size, but there may be a slight loss of quality during playback or editing. This setting should be adjusted with a balance between video quality and file size in mind.
Decoder Resolution Compatibility
The "Decoder Resolution Compatibility" option is designed to resolve compatibility issues that may occur in certain video players during playback. Some video players, such as GOM Player, may display videos blurry if they do not meet specific resolution alignment rules. To prevent this, oCam automatically adjusts the horizontal resolution of the recording area to a multiple of 8 and the vertical resolution to a multiple of 4 by default. For example, if the user specifies a recording area of 427x241, since 427 is not divisible by 8, it will be adjusted to 424, and since 241 is not divisible by 4, it will be adjusted to 240. The final recording resolution will therefore become 424x240. This setting helps ensure video compatibility and supports stable playback across different players.
Usage Tips
If you adjust the settings in the "Recording - General" tab according to your recording purpose, you can get more effective results. For example, when creating lecture videos, it is a good idea to include the cursor and keep FPS at 30 for a natural-looking recording. On the other hand, when recording high-performance games, it is important to increase FPS and adjust the keyframe interval properly to balance quality and file size. In addition, the decoder resolution compatibility setting helps ensure that videos play correctly across different platforms. These detailed settings in oCam are very helpful for producing high-quality recordings tailored to your needs.
The "Recording - General" tab in oCam provides intuitive yet powerful features, allowing beginners to adjust settings easily while giving IT professionals the ability to fine-tune details for optimal results. Try using these settings according to your recording environment.
Today's News/Tips
How to Set Up Automatic Login Using Autologon.exe
Here is how to set up automatic login using the autologin tool.
This method uses Autologon.exe from Microsoft's official Sysinternals Suite. It also provides a certain level of security by storing the password in encrypted form in the registry.
How to Set Up Automatic Login Using Autologon.exe
1. Download Autologon
Official Microsoft site: https://learn.microsoft.com/en-us/sysinternals/downloads/autologon
File download link: https://download.sysinternals.com/files/AutoLogon.zip
Click the Download Autologon button at the link above to download the ZIP file.
After extracting it, you will see the `Autologon.exe` file.
2. Run Autologon and Configure It
Run `Autologon.exe` as administrator. (Right-click → "Run as administrator")
When the window opens:
Username: The account to log in automatically
Domain: In most cases, the computer name is filled in automatically
Password: Enter the password for that account
Click the [Enable] button
If the message “Autologon successfully configured” appears, setup is complete!
3. How to Disable Automatic Login
Run `Autologon.exe` the same way and click [Disable] to turn off automatic login.