oCam Advanced Settings - Sound
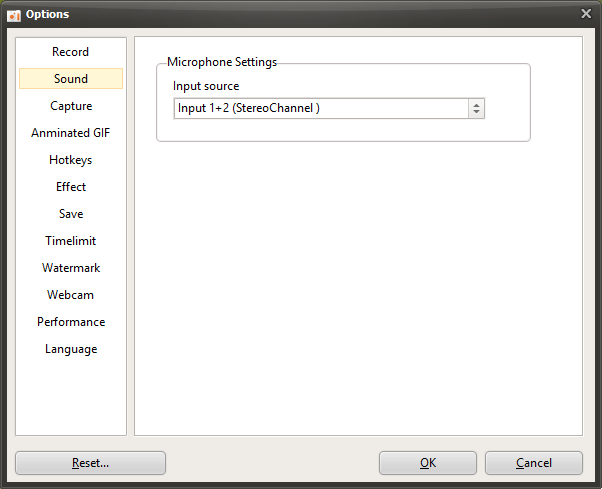
oCam is user-friendly software that not only supports screen recording but also allows you to fine-tune sound recording settings, helping you achieve optimized recording for a wide range of audio input environments. In the settings window that appears when you click the "Tools - Options" menu, selecting the "Sound" category on the left lets you check and adjust microphone-related settings. This tab is especially useful for users who need to solve microphone input issues or apply specific audio settings. Below is a detailed explanation of the settings available under the "Sound" category.
Current Microphone Settings
The "Sound" category provides options related to the current microphone settings, and by default, these settings are configured appropriately for most users, so they can usually be used reliably without any changes. In a typical recording environment, both system sound and microphone audio are recorded properly, and the default settings are generally enough to capture high-quality audio. For example, when using microphone input for lecture videos or game streaming, the default settings are sufficient for most needs.
Resolving Microphone Audio Issues
However, in certain situations, especially when using a USB audio interface or advanced audio equipment, you may encounter an issue where microphone sound is played through only one speaker, either the left or the right. This usually happens when the audio input channel settings are not configured correctly. In the "Sound" category of oCam, simple setting adjustments are provided to resolve this issue.
If sound is coming from the left speaker only: Change the microphone input source to "Input 1 (Left Channel)" to fix the problem. This setting correctly adjusts the microphone audio signal when it is focused only on the left channel, allowing balanced output through both speakers.
If sound is coming from the right speaker only: Change the microphone input source to "Input 2 (Right Channel)." This setting adjusts the audio signal coming into the right channel so that it is evenly distributed through both speakers.
These setting changes are especially useful in environments that use USB audio interfaces or stereo input, and they are an essential feature for users who want to optimize audio quality.
Usage Tips
The settings in the "Sound" category are simple, but they are very effective for resolving issues in certain audio environments. For example, streamers or content creators using a USB microphone or audio interface can quickly fix audio channel issues through these settings. After changing the settings, it is a good idea to run a short test recording to make sure the microphone audio is being recorded evenly on both channels. It is also important to adjust the microphone input level properly so that the sound is not too loud or too quiet.
If you are in a normal environment without a USB audio interface, you can usually get stable recording results just by keeping the default settings. However, if you are using advanced audio equipment, adjusting these settings to balance the audio output can be very helpful in improving the overall quality of the video.
Today's News/Tips
oCam Advanced Settings - Recording - Game Tab
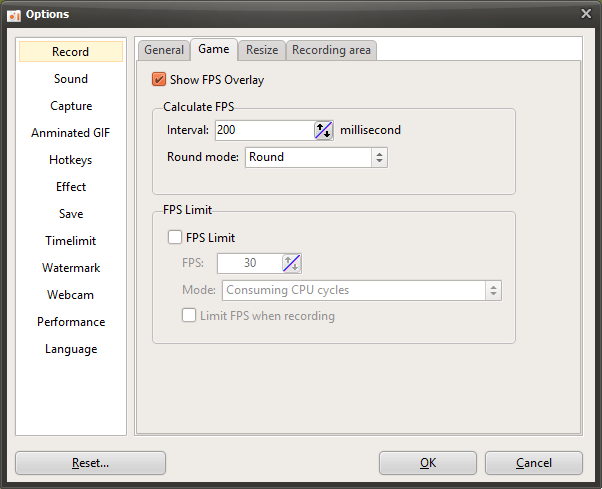
oCam is software that provides settings specialized for game recording, helping gamers and content creators capture high-quality gameplay footage with ease. In the settings window that appears when you click the "Tools - Options" menu, the "Game" tab under the "Recording" category provides detailed settings optimized specifically for game recording. The options in this tab include various features for managing gameplay frame rates (FPS) and optimizing system resources, allowing users to adjust recording to suit their own environment. Below is a detailed explanation of the main settings in the "Game" tab.
Show FPS
The "Show FPS" option determines whether the real-time FPS (frames per second) value is displayed in the top-left corner of the screen while using game recording mode. By default, this option is checked, so the FPS value appears on the screen during game recording. This feature is useful for users who want to monitor game performance in real time. For example, it helps you check whether the game is running smoothly or whether frame drops are occurring during recording. If you do not need the FPS display, you can disable this option to keep the screen cleaner.
FPS Calculation - Interval (Milliseconds)
The "FPS Calculation - Interval" setting lets you specify the time interval used to display FPS in milliseconds (ms). FPS means the number of frames drawn per second and is calculated based on 1,000 milliseconds (1 second). If the user enters a value smaller than 1,000 ms, oCam calculates and displays a predicted FPS value based on that interval. For example, if it is set to 500 ms, the FPS will be updated every 0.5 seconds. This setting is useful when you want to monitor frame rate changes in more detail.
In addition, "Rounding Mode" is an option that lets you choose how decimal values are handled when calculating FPS. You can select rounding, round up, or round down, allowing you to adjust how the FPS value is displayed. For example, if you choose rounding, the FPS will be shown as a neatly rounded whole number.
FPS Limit
"FPS Limit" is a feature that restricts the game's frame rate in game recording mode to a value specified by the user. This setting allows you to adjust the game's FPS to the level you want, which is useful for optimizing system resource usage or maintaining consistent recording quality. Two modes are provided for FPS limiting:
Consume CPU Cycles: This mode continuously uses the CPU to keep the frame rate as close as possible to the FPS value entered by the user. This method is suitable when precise FPS control is needed, such as when you want stable recording in a high-spec game. However, CPU usage may increase, so you should pay attention to system performance.
Yield to CPU: This mode limits FPS while minimizing CPU usage. It adjusts frames by using idle time, so it has the advantage of reducing CPU load, but FPS limiting may have a slight margin of error. This method is useful for users who want to save system resources or record on a lower-spec PC.
Limit FPS Only While Recording
The "Limit FPS Only While Recording" option applies the FPS limit only while recording is actually in progress. In other words, the specified FPS limit works only while recording is active after pressing the record button, and once recording stops, the game runs again at its original FPS. This setting is useful for users who want to manage gameplay and recording separately. For example, you can enjoy the game at maximum performance during normal play and limit FPS only during recording to get more stable video.
Usage Tips
The settings in the "Game" tab play a key role in balancing recording quality and system performance. For example, when recording a high-spec game, you can use the "Consume CPU Cycles" mode to set an accurate FPS limit and adjust FPS to 60 or higher for smoother footage. On the other hand, on a lower-spec system, it is better to choose the "Yield to CPU" mode to reduce resource usage. In addition, by enabling the Show FPS feature to check performance in real time, you can quickly identify frame drops or performance degradation during recording.