What to Do If the Sound Becomes Louder or Distorted When Playing Recorded Videos in PotPlayer
When playing a video recorded with oCam in PotPlayer, the sound may sometimes be different from the original recording or become distorted. This may be caused by PotPlayer's Normalizer setting. Below is a detailed explanation of how to disable the Normalizer setting so the original sound plays back as it was recorded.
To disable the Normalizer in PotPlayer's Preferences, follow these steps:
1. Run PotPlayer.
2. Open the Preferences window. To do this, press the F5 key on your keyboard, or right-click on the player screen and select 'Preferences' from the menu that appears.
3. When the Preferences window opens, click the 'Audio' category in the left menu, then go to the 'Normalizer/Reverb' submenu.
4. In the 'Normalizer/Reverb' settings, check whether the 'Use Normalizer During Playback' option is enabled. In most cases, this option is enabled by default.
5. Uncheck 'Use Normalizer During Playback', then click the 'OK' button to save the setting.
After applying this setting, PotPlayer will no longer automatically amplify the sound, so the original sound recorded with oCam will play back as it is.
Note: What is the Normalizer feature?
The Normalizer is a feature that amplifies the playback volume to match 0dBFS (decibels full scale). For example, if the original sound was recorded at -20dBFS, the Normalizer amplifies it closer to 0dBFS so it sounds louder. However, if the sound is amplified too much during this process, it may become distorted or crackle. The dB used here does not mean ordinary decibels (dB), but rather the dBFS unit used in digital audio environments.
By disabling the Normalizer, you can play back videos recorded with oCam while preserving the original volume and sound quality. If the sound still has problems, check PotPlayer's other audio settings, such as the equalizer or volume control, or review the recording settings in oCam.
Today's News/Tips
What to Do If Chrome Blocks the Download with "Blocked by Chrome because it's dangerous."
When trying to download OhSoft software (for example, oCam) in the Google Chrome browser, you may see the warning message "Blocked by Chrome because it's dangerous." This issue occurs because Chrome has incorrectly detected the OhSoft program as unsafe, which is a false positive.
This does not usually happen, but it may occasionally occur shortly after an update has been released.

OhSoft programs are safe software that do not distribute malware, sponsored programs, or any other malicious software. This warning is most likely the result of Chrome's security filter making an incorrect judgment based on the file's source or reputation information. To resolve this issue, follow the steps below:
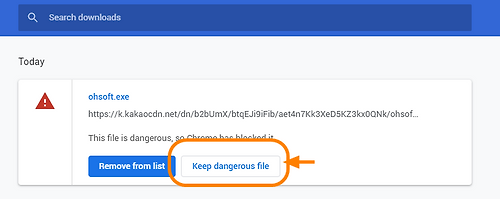
1. In Chrome's download bar (the download notification shown at the bottom), click the warning message.
2. In the window that appears, click the "[Show all]" button.
3. When the additional options window opens, select "[Keep dangerous file]" and proceed with the download as instructed.
By following this process, you can bypass Chrome's block and safely download the OhSoft software.
If the problem continues, you may also temporarily disable the Safe Browsing feature in Chrome settings or contact OhSoft for assistance.